
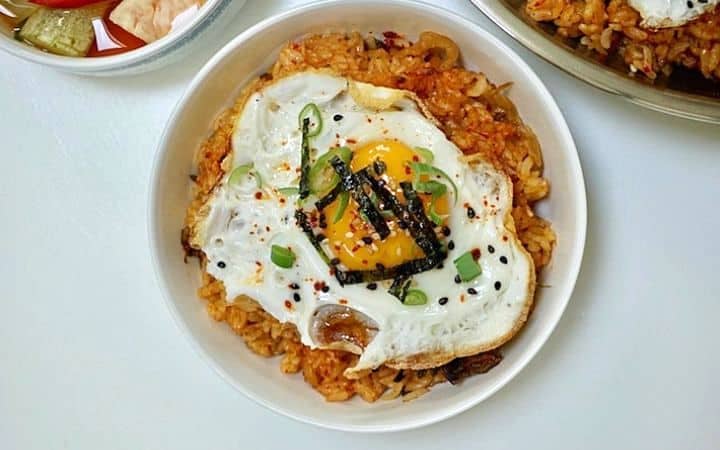
Kimchi pork fried rice or kimchi bokkeum bap (김치 볶음밥) cooked in a pressure cooker is the freshest way to make this quintessential Korean dish. You can make the finished rice more crispy afterward or serve it straight from the pressure cooker! Your family will love this all-in-one bowl of exploding flavors and they will request it regularly!

This post was written as a Mealthy partner but the opinions and the recipe is my own. And as my policy, I only write about products I request to review and good enough to recommend to you.
Kimchi fried rice or kimchi bokkeum bap (김치 볶음밥) is a quintessential dish every Korean enjoys. It's savory, spicy, easy, and most of all, inexpensive to make. As the title suggests, the traditional version requires only two ingredients - leftover rice and aged kimchi. That's it! It's an easy poor man's dish that everyone can make!
Intro
Convenient and Cheap One Bowl Meal
This is a really easy and cheap one-bowl meal that will feed yourself or your family for almost no money.
I remember eating it a lot when I was in college.
When I was a poor college student, I'd buy a (small) jar of kimchi and a 5 lb bag of rice since they provided me with many meals. After a long day of classes, and didn't want to have plain kimchi and rice - again - I'd stir fry some old kimchi with butter, add rice from the rice cooker to make this quick and easy one bowl meal.
If I felt like splurging, I'd crack an egg to scramble with the frying rice for extra protein. And it was cheaper than using meat like pork or chicken, but tasted like an expensive meal. I never got tired of it, and even now, as a grown-up, I prefer kimchi fried rice over a slice of pizza any day of the week.
Kimchi Fried Rice For Families
There are lots of different ways you can make kimchi fried rice.
I make homemade kimchi regularly now, so I have a continuous supply of kimchi to make dishes like this whenever I feel like eating a flavor-filled one-bowl dish. I intentionally let some kimchi to ferment longer to have on hand for recipes like this.
Since I can afford it now, I also add meat, like pork or beef or chicken, to make it more flavorful. And I learned, I prefer sunny side up egg on top since the runny yolk makes the rice so creamy.
One other significant recipe change since my college days is I don't use old rice to make this dish anymore. I use the pressure cooker, like the Mealthy Multipot to cook from scratch, from cooking the rice with kimchi and meat at the same time. I don't wait until I have old rice to make this as I think this recipe deserves proper recognition by creating it from scratch.
Variations
There are lots of different ways you can make Kimchi Fried Rice. These are some of my favorite variations.
Original
If you just use kimchi and rice, you would be making the authentic, original Kimchi Fried Rice I used to make in college. You can't go wrong if you don't add any animal protein and just use the two original ingredients.
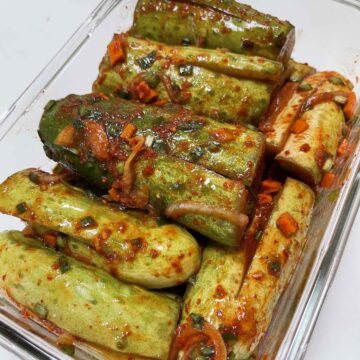
If you don't make kimchi at home (What are you waiting for?? Kimchi Fried Rice alone is worth making my easy simplified kimchi recipe ) you can use store-bought kimchi. To age new kimchi, leave it out on the counter for a few days until it's sour. Older the kimchi, the better.
Pork Kimchi
I decided to use pork belly for this particular recipe, but there's no rule on what cut of pork you should use. You can use pork belly, pork chop, tenderloin, or even ground pork.
Beef
If you have leftover bulgogi, that would be the best and quickest way to add even more flavorful meat. But if you don't have it, you can saute thin slices of strip steak or chuck in the pan before adding rice.
Shrimp
While shrimp is not a typical protein for kimchi fried rice, why not? If you love shrimp, it will make a perfect protein choice.
Squid
There is a Korean fried rice recipe called "Squid Fried Rice," but it doesn't contain kimchi so adding squid in Kimchi Fried Rice would be a genius idea. Maybe I'll share this recipe with you here later.
Bacon
While bacon is not exactly an authentic Korean ingredient, it's bacon! The crispy texture and smoky flavor add a whole 'nother layer of umami, so it makes a perfect protein for this dish.
Tofu
It's well-known that soy is unhealthy for you and you shouldn't eat it. And I would agree if soybeans were used in any other highly processed soybeans or tofu-derived recipes, like making Seitan or Tofu burger. Blech.
But I love Korean tofu recipes, and there's nothing wrong or unhealthy about eating tofu occasionally. Just make sure to use sprouted organic tofu, which is so much healthier than conventional tofu. Tofu would crumble and become mushy if cooked with the rice so immerse sprouted organic tofu in hot water and set aside to add to the fried rice later.
Cheesy Kimchi
As strange as it may sound, melty cheese, like cheddar or mozzarella, works really well with this dish, especially if it's extra spicy. Dairy has been known to reduce the heat so Koreans love using mozzarella cheese in spicy foods. If you can tolerate dairy, top the rice with cheese you like to melt under the Mealthy's CrispLid or broiler before serving.
Mealthy Pressure Cooker
If you are a reader of my blog or bought my cookbooks, you know how much I use the Instant Pot. I mean, I even wrote cookbooks with recipes using the Instant Pot since I use it daily. And you might be wondering, why are you cheating on Instant Pot and talking about Mealthy Multipot? I know how it might seem but hear me out.
American Company
I came across this new-ish company called Mealthy a few months ago and I haven't stopped using their products since then. Mealthy is an American company from California and has been introducing so many kitchen appliances and gadgets to improve your cooking. (Instant Pot was owned by a Canadian but now it's been sold this year to Corningware, an American corporation that makes Pyrex and Corningware products.)
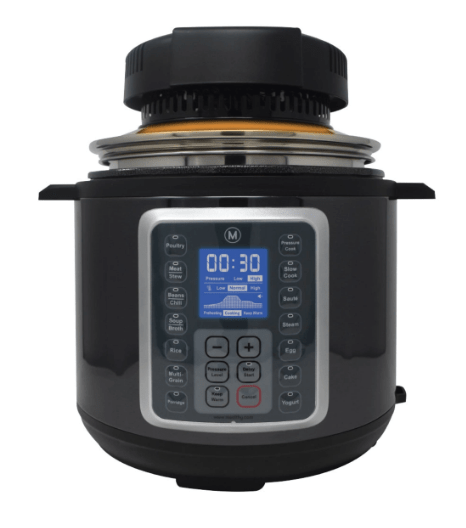
9-in-1 Pressure Cooker
And one of the Mealthy's products is a pressure cooker called the "Multipot 9 in 1 Programmable Pressure Cooker" (A comparable Instant Pot pressure cooker in the same price range is only 7 in 1 pressure cooker.) and I've been trying it out for months. So far, I love the Multipot. That's why I decided to write this particular recipe first using the Multipot.
Crisp Lid
If their pressure cooker is not amazing enough, they have a cool gadget called the CrispLid that makes food crispy, like an air fryer. But the beauty of the CrispLid is being able to use it on ANY pressure cooker - YES, even the Instant Pot - as long as they are 6 or 8 Qt size.
Just put the CrispLid on top of the pressure cooker, turn it on, and it will make your food crispy! Easy peasy. And no extra counter space needed. I use CrispLid more often than my Philips Air Fryer now. It's so much more convenient than taking out the heavy air fryer. In fact, I use it to make this recipe crispy and I share how to do that below.
Mealthy Discount Code
You know I don't talk about products I don't love. In fact, any time I talk about a product, I am the one who asked the company to review it. Since I love these so much I asked Mealthy to offer my readers a discount and they obliged! So, here's use my discount code "DRKARENSLEE", and they will discount $10 off from your total purchase of $59.99 or more.
Finally, here is the Kimchi Pork Fried Rice made in the Mealthy Multipot.
Instructions
All of the instructions are in the printable recipe card at the bottom of this post. First, I will just give you an overview of the recipe, along with some helpful step-by-step pictures.
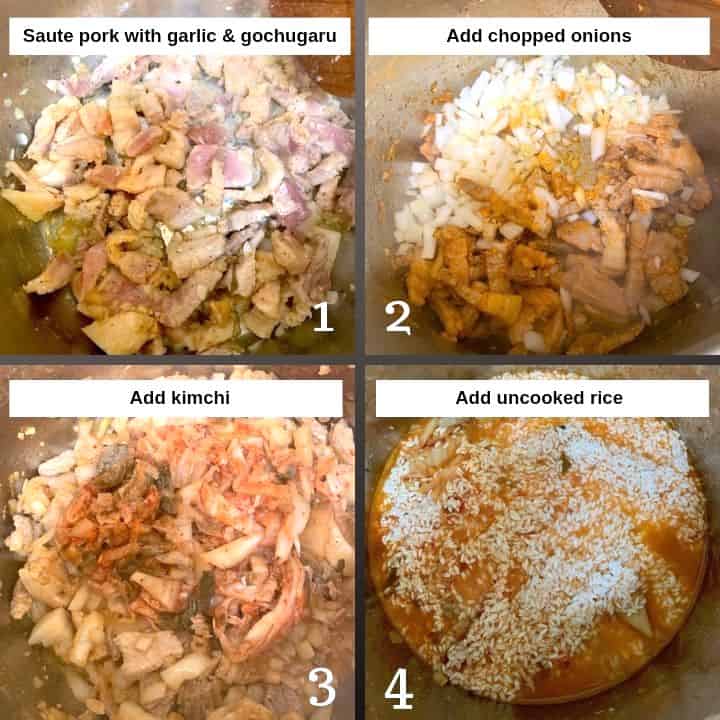
First, plug in Mealthy Multipot and turn it on by pressing the "Sauté" button. Insert the inner pot. Add butter or ghee and the pork to the inner pot and sauté until the pork starts to turn brown. Add gochugaru, if using, and garlic. (Photo 1 in the collage below)
Next, add chopped onion to the inner pot and continue to stir until pork becomes brown and onion becomes translucent (photo 2).
Add sliced kimchi to the inner pot and continue to stir until kimchi is incorporated (photo 3).
Add the washed, soaked, and uncooked rice (read this post on how to reduce arsenic in rice) Add the kimchi liquid and chicken broth. Pat down the rice with a spoon just so that it's submerged in the liquid but do NOT stir too much (photo 4).
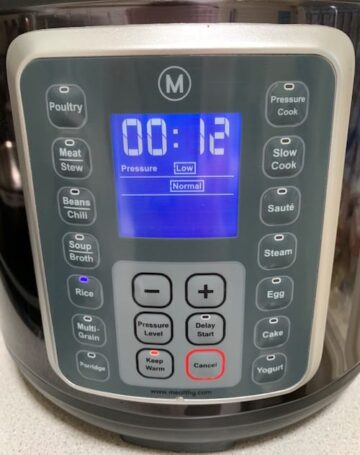
Next, close the lid tightly, and press the "Rice" button.
Notice the "Rice" setting is set on "LOW" pressure. This is the only programmed setting that uses the "LOW" pressure since starchy ingredients like rice can create foam and may block the steam float valve (the red pin on top of the lid that goes up and down depending on the pressure inside) so you have to be careful not to create too much foam on HIGH pressure.
There are times when I do use the HIGH pressure to cook rice but for this recipe, I like to be safe so I am using the pre-programmed "RICE" setting.

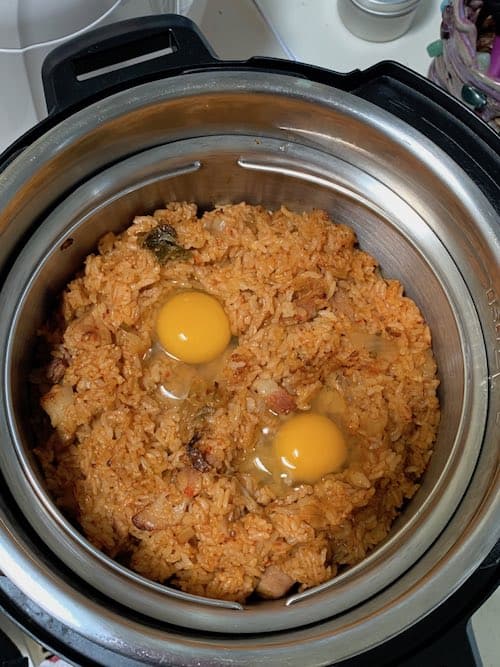
When the timer is finished, you will hear a beeping sound. Turn the steam vent handle to "Venting" to allow the steam to escape. This is called the Quick Release (QR) or Manual Release. When the red float valve drops down and the lid is unlocked, open the lid carefully.
Stir the ingredients in the inner pot well. You are ready to eat, but if you want to make the rice drier or crispier, you have several options described below.
Pro Tips
3 Methods to Make Kimchi Pork Fried Rice Crispy
Serve without making rice crispy - Traditionally, Kimchi Fried Rice is a bit drier and has a crispy side since it's cooked in a skillet. But since this recipe is made using the Mealthy Multipot, a pressure cooker, the rice will be less crispy when it's finished. I mean, it's still delicious, and you can definitely serve it right out of the Multipot.
The only make thing you'll have to make while the rice is cooking in the Multipot is the sunny side up eggs in a skillet separately. After the rice is done, plate the rice in bowls and place the cooked egg on top. Garnish with toasted sesame seeds, seaweed strips, and scallions and serve immediately.
Mealthy CrispLid Method - if you have the CrispLid from Mealthy, this is a perfect way to make the Kimchi Pork Fried Rice crispy in one shot.
Transfer the rice mixture into the stainless steel basket that came with the Multipot. Pat down the top of the rice a little, and create small craters on top for the eggs.
Rinse the inner pot and insert it back in the Multipot. Place the trivet that came with the Multipot inside the inner pot. Put the basket with the rice on top of the trivet. DO NOT put water in the inner pot since you'll be using the CrispLid and not the Multipot.
Place the CrispLid on top of the Multipot. Plug in the lid, and lower the handle until you hear the click sound. Set the temperature at 400 degrees and timer at 4 minutes. Press "Start" - the triangle icon button. When the timer ends, carefully lift the CrispLid and place it on the silicone mat.
It's very hot, so be careful. Gently crack the eggs in the craters on top of the rice. Place the CrispLid back on the Multipot and press the Start button again. The temperature and time should still be 400 degrees and 4 minutes.

Check the rice through the top of the glass to make sure the eggs are not being overcooked. When the timer goes off or when the eggs are cooked as your desired doneness, lift the lid off the Multipot and place it on the silicone mat and unplug the CrispLid.
Take out the basket carefully and plate the rice into bowls with the eggs without breaking the yolks. Garnish with toasted sesame seeds, seaweed strips, scallions and serve immediately.

Pan or Skillet Method - Cook the eggs to your liking in a pan or a skillet and set aside to use later. Add 2 teaspoon of sesame oil to the same pan and sauté the Kimchi Pork Fried Rice until the bottom of the rice gets crispy. Stir occasionally, so the rice doesn't burn.
Evaporating extra moisture and making the bottom crispy or crusty is what you're aiming for so don't over mix. I love using a deep pan, like the Mealthy's pan pictured below because of the almost 2.5" depth. It's perfect for making rice dishes like this.
Mealthy's stainless steel 10-inch frying pan is a deep skillet!
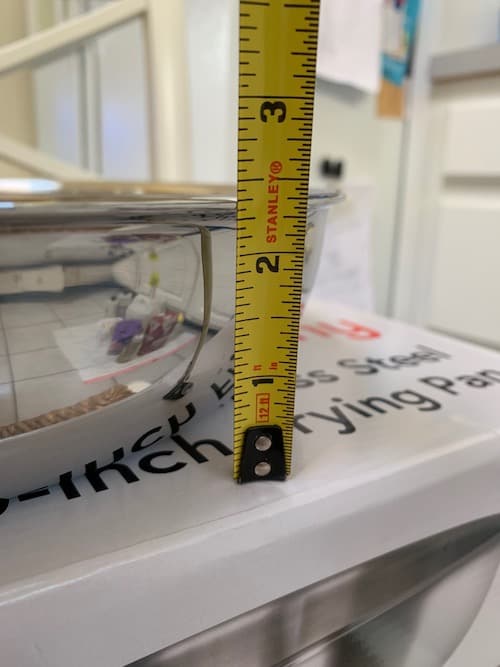
I love the 2 ½ inch depth to accommodate more food!
After sautéing for 3-5 minutes, the rice should be less soggy and crispy on the bottom. Plate the rice into bowls, top them with the eggs you prepared. Garnish with toasted sesame seeds, strips of seaweed, scallions and serve immediately.
Related recipes
Here is the written recipe you can save or print.
Recipe

Kimchi Pork Fried Rice
Equipment
- Mealthy Multipot
- Crisp Lid
Ingredients
- 2 tablespoon ghee or butter
- 1-1 ½ c pork belly or pork chop or pork tenderloin cut in ½ inch pieces
- 1 tablespoon gochugaru optional or use more if needed
- 1 c chopped onion
- 4 cloves garlic minced
- 1 c aged kimchi chopped
- 2 c uncooked short or medium grain rice washed, soaked for an hour, and drained
- 1 teaspoon sea salt
- ½ teaspoon fresh black pepper
- ¾ c kimchi liquid
- 1 c chicken broth
- 4 eggs see below how and when to cook them
Garnish
- ¼ c finely chopped scallions for garnish
- ½ teaspoon toasted sesame seeds for garnish
- ½ teaspoon black sesame seeds for garnish optional
- 1 sheet gim or nori cut in thin strips for garnish
Crispy Rice in Pan
- 2 tsp sesame oil
- 1 tablespoon avocado oil for pan frying the eggs
Instructions
- Turn on the Mealthy Multipot by pressing the "Sauté" and add butter or ghee and the pork to the inner pot. Sauté until the pork starts to turn brown.
- Add gochugaru, if using, and onion to the inner pot and continue to stir until pork becomes brown and onion becomes translucent.
- Add sliced kimchi to the inner pot and continue to stir.
- Add the washed, soaked and uncooked rice. Add the kimchi liquid and chicken broth. Pat down the rice with a spoon just so that it's submerged in the liquid but do NOT stir too much.

- Close the lid tightly, and press the "Rice" button.

- If you want to eat the fried rice when it's done without making it crispy, this is the time to cook the eggs on a pan as your desire doneness. While the sunny side up with runny yolk is perfect for this recipe, scrambled eggs is fine as I used to use in college. You can scramble the eggs and mix it in when serving. Set the eggs aside and add to the rice before serving.
- When the timer is finished, you will hear a beeping sound. Turn the steam vent handle to "Venting" to allow the steam to escape. When the red float valve drops down, open the lid carefully.
- Stir the ingredients in the inner pot well. You are ready to eat. But if you want to make the rice crispy, follow the options below.


Crisp Lid
- Transfer the rice mixture into the stainless steel basket that came with the Multipot. Pat down the top of the rice a little, and create small craters on top for the eggs. Rinse the inner pot and insert it back in the Multipot. Place the trivet that came with the Multipot inside the inner pot. Put the basket with the rice on top of the trivet. DO NOT put water in the inner pot since you’ll be using the Crisp Lid and not the Multipot.
- Place the Crisp Lid on top of the Multipot. Plug in the lid, and lower the handle until you hear the click sound. Set the temperature at 400 degrees and timer at 4 minutes. Press “Start” – the triangle icon button. When the timer ends, carefully lift the Crisp Lid and place it on the silicone mat. It’s very hot, so be careful. Gently crack the eggs in the craters on top of the rice. Place the Crisp Lid back on the Multipot and press the Start button again. The temperature and time should still be 400 degrees and 4 minutes.
- Check the rice through the top of the glass to make sure the eggs are not being overcooked. When the eggs are cooked as your desired doneness, lift the lid off the Multipot and place it on the silicone mat. Take out the basket carefully and plate the rice into bowls with the eggs without breaking the yolks. Garnish with toasted sesame seeds, seaweed strips, scallions and serve immediately.
In The Pan or Skillet
- Cook the sunny side up eggs in a pan or a skillet and set aside to use later. Add 2 teaspoon of sesame oil to the same pan and sauté the Kimchi Pork Fried Rice until the bottom of the rice gets crispy. Stir occasionally, so the rice doesn’t burn. Evaporating extra moisture and making the bottom crispy or crusty is what you’re aiming for so don’t over mix. I love using a deep pan, like the Mealthy’s pan pictured below because of the almost 2.5″ depth. It’s perfect for making rice dishes like this.
- After sautéing for 3-5 minutes, the rice should be less soggy and crispy on the bottom. Plate the rice into bowls, top them with the eggs you prepared. Garnish with toasted sesame seeds, strips of seaweed, scallions and serve immediately.
Notes
If you like this recipe, check out these pressure cooker Korean recipes.
How to make rice in the Instant Pot
Braised Korean Short Ribs (Galbijjim)
Eggs Five Ways for Instant Pot (see Steamed Eggs)
Vegetable Rice Porridge
Mealthy Multipot and CrispLid
Wow. I didn't expect this post to be this long. If you are still reading this, you are an expert at Kimchi Pork Fried Rice! You can use any of the methods I mentioned above but one thing for sure; you now have the freshest kimchi fried rice recipe - from making the rice from scratch in the pressure cooker like the Multipot and finishing it in the Mealthy CrispLid or in the pan. No more waiting until you have old rice!


Deborah Arem says
It's time I got on the bandwagon here I know ! would love to win these as well !
Jennifer Heftler says
Looks great
Cindra says
Love your Keto Cooking w/your Instant Pot recipe book!! Made the Classic Italian Ratatouille, for the second time tonight; tomorrow & the next day, I will be making the Best Keto Beef Stew, and the Smothered Pork Chops for the first time!
I am so interested in the Mealthy air fry lid!!! I had no idea this product existed! Too perfect when I already have an 8qt pressure cooker, but not room for another small appliance!! Thank you for the introduction of this product, and for the giveaway opportunity!!
Denise says
Thank you for an informative post and giveaway opportunity! Following!!
Marie Buccellato says
I would love to win this combo!!
Tim says
I like the Handblend. I used to have a similar product called a Thunderstick that we used all the time before it broke.
TraceyKuz says
Can’t wait to try this
Kelly D says
I would like the Mealthy Handblend.